Deploying a React Front‑End with a Spring Boot Back‑End – A Hands‑On Guide
- Nishadil
- November 07, 2026
- 0 Comments
- 5 minutes read
- 2 Views
- Save
- Follow Topic
From local code to production: packaging React, Spring Boot, Docker, and Nginx together
Learn how to turn your React UI and Spring Boot API into a single, container‑based production deployment using Docker, Nginx and simple configuration tricks.
Deployment, in plain English, is the moment you push your code out of the dev box and let real users play with it. When you have a React front‑end talking to a Spring Boot back‑end, there are a few moving parts, but the overall idea is simple: build the UI into static files, package the server into an executable, and make sure they can talk to each other securely.
What actually gets shipped? The React side becomes a bundle of HTML, CSS and JavaScript – all minified and ready to be served by a web server. The Spring Boot side, on the other hand, is compiled into an executable JAR (or a Docker image) that carries the Java runtime, all dependencies, and your business logic.
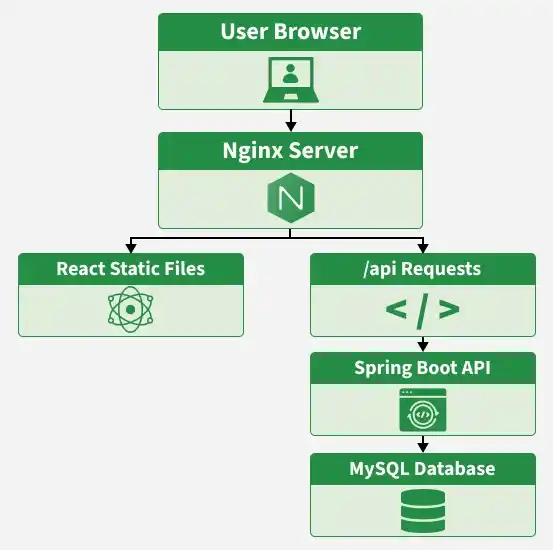
Below is a quick sketch of a typical setup:
1️⃣ React is built → static files live in dist/.
2️⃣ Spring Boot is packaged → a .jar appears in target/.
3️⃣ Docker wraps each piece into its own container.
4️⃣ Nginx sits in front, serving the static UI and proxying /api calls to the Spring container.
5️⃣ A MySQL container holds the data.
That arrangement lets the browser see everything under one origin (e.g., https://myapp.com), which means you don’t have to wrestle with CORS every time.
Tech stack we’ll use:
• React – UI framework
• Vite – fast bundler for React
• Spring Boot – REST API provider
• Java 17 – runtime for the back‑end
• Maven – dependency and build manager
• MySQL – relational database
• Docker + Docker‑Compose – isolation and orchestration
• Nginx – static file server & reverse proxy
Step‑by‑step deployment (Docker‑centric)
Step 1 – Organise the repo
Separate folders make life easier: frontend/ for React, backend/ for Spring Boot. Keep a top‑level docker-compose.yml that glues everything together.
Step 2 – Build the Spring Boot JAR
From the backend directory run:
mvn clean package
Maven compiles, runs your tests, and drops an executable like target/rolebasedauth‑0.0.1‑SNAPSHOT.jar. You can test it locally with java -jar target/rolebasedauth‑0.0.1‑SNAPSHOT.jar, but remember the JAR still expects environment variables for DB credentials, JWT secret, etc.
In production we’ll let Docker do the build, so the host machine doesn’t need Maven at all.
Step 3 – Build the React UI
Enter frontend and run:
npm installnpm run build
Vite spits out a tidy dist/ folder containing index.html, hashed JS and CSS files. You can peek at it locally with npm run preview, but that command is only for a quick sanity check – it’s not meant for real traffic.
Step 4 – Point the UI at the right API
During dev you probably have something like:
const API_URL = "http://localhost:8080/api";
That won’t work once the app is live because “localhost” would refer to the visitor’s own computer. The easy fix is to use a relative path and let Nginx forward the request:
import axios from "axios";

const api = axios.create({ baseURL: "/api" });

api.interceptors.request.use(cfg => {
  const token = sessionStorage.getItem("token");
  if (token) cfg.headers.Authorization = `Bearer ${token}`;
  return cfg;
});

export default api;
Now the browser calls /api/auth/login and Nginx rewrites it to the Spring service.
Step 5 – Tweak Spring Boot for the container
Open backend/src/main/resources/application.properties and replace hard‑coded values with placeholders that Docker will fill at runtime:
spring.datasource.url=${SPRING_DATASOURCE_URL}
spring.datasource.username=${SPRING_DATASOURCE_USERNAME}
spring.datasource.password=${SPRING_DATASOURCE_PASSWORD}
app.jwt.secret=${JWT_SECRET}
That way the same image can be reused in dev, test, or production – you just swap the environment variables.
Step 6 – Write the Dockerfiles
Two simple Dockerfiles do the trick. For the back‑end:
FROM eclipse-temurin:17-jdk-alpine
WORKDIR /app
COPY . .
RUN ./mvnw clean package -DskipTests
EXPOSE 8080
ENTRYPOINT ["java","-jar","target/rolebasedauth‑0.0.1‑SNAPSHOT.jar"]
And for the front‑end (you can also let Nginx copy the built files):
FROM node:20-alpine AS build
WORKDIR /app
COPY package*.json ./
RUN npm ci
COPY . .
RUN npm run build

FROM nginx:stable-alpine
COPY --from=build /app/dist /usr/share/nginx/html
EXPOSE 80
Step 7 – Wire everything with docker‑compose
A minimal docker‑compose.yml might look like this:
version: "3.9"
services:
  db:
    image: mysql:8
    environment:
      MYSQL_ROOT_PASSWORD: example
      MYSQL_DATABASE: mydb
    ports:
      - "3306:3306"
  backend:
    build: ./backend
    environment:
      SPRING_DATASOURCE_URL: jdbc:mysql://db:3306/mydb
      SPRING_DATASOURCE_USERNAME: root
      SPRING_DATASOURCE_PASSWORD: example
      JWT_SECRET: supersecret
    depends_on:
      - db
  frontend:
    build: ./frontend
    ports:
      - "80:80"
    depends_on:
      - backend
Run docker compose up -d and voilà – you have a React UI served by Nginx, a Spring Boot API handling business logic, and a MySQL database, all running in isolated containers.
Take a moment to test the whole flow. Open http://localhost in a browser, log in, hit a protected endpoint, and watch the logs in the backend container. If something looks off, check the environment variables and Nginx’s proxy config – most hiccups happen there.
That’s essentially it. With a handful of commands you’ve turned a local development setup into a reproducible, production‑ready stack that can be pushed to any cloud that supports Docker.
- India
- News
- Technology
- TechnologyNews
- Commerce
- Upsc
- Mathematics
- School
- K12
- AndroidDevelopment
- Tutorial
- Programming
- Java
- DataScience
- Nodejs
- Cbse
- Python
- Docker
- Javascript
- SystemDesign
- Php
- Aptitude
- Placement
- Mysql
- Nginx
- CompetitiveProgramming
- CodingContests
- SpringBoot
- ReactDeployment
- FullStackDeployment
- Vite
Editorial note: Nishadil may use AI assistance for news drafting and formatting. Readers can report issues from this page, and material corrections are reviewed under our editorial standards.